The Canvas is where you manage the production of all of your content. Split into columns, you can see in a single view the status of all of your blogs and social posts. You can also edit, preview, and schedule your content from this single page.
Production stages
All content (blogs, social posts etc.) follow the same basic workflow. Starting from the left of the Canvas as Ideas, working their way across until they are Live. You can drag and drop Content cards from one stage to the next to update its settings and trigger relevant actions.
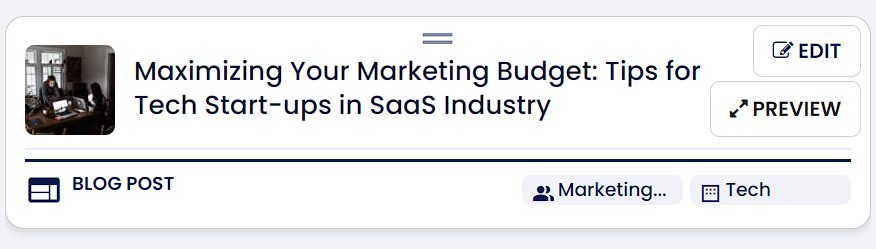
Content cards
All content on the Canvas is represented by ‘Content Cards’. The cards give you a lot of information in a small, easy to digest format. Title, Thumbnail, Content Type/Medium, Content Targets, and action buttons.
The details displayed and available action buttons changes depending on the status of that piece of content. For example, when a Content Card is in the ‘Ready to Schedule’ column it can not be editted. Whereas, if the Content Card is in the ‘In Progress’, or ‘Ideas’ column, it can not be scheduled.
A Content Card
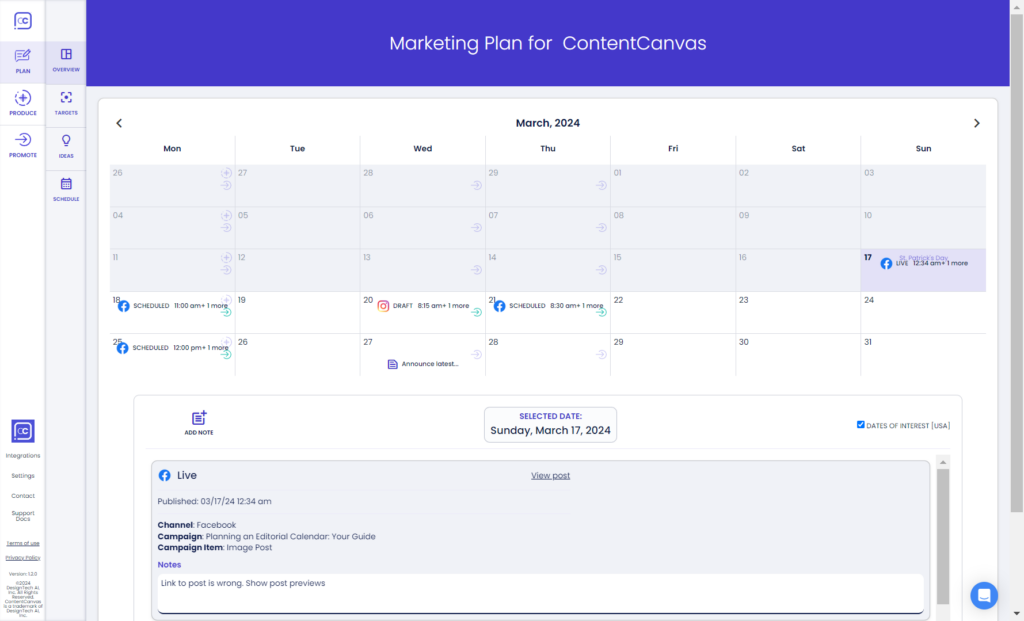
Calendar
One of the most powerful features of the Canvas, is the Calendar. The Scheduled column displays all scheduled content visually using mini-content cards.
You can quickly see exactly which content and the type of content that will be published each month
You can drag and drop the cards to change the date that the content will be published.
Clicking on a Content Card will open a Preview of the final asset.
Scheduling Calendar
Production Stages: Ideas
Defininition
Your content journey all begins with Ideas. In ContentCanvas, the ideas column acts as repository of all of the amazing content ideas that you want to produce.
You can drag and drop the Content Cards inside the Ideas column to visually organize their priority
Create a new idea
To add a new idea, click on the ‘Create’ button in the main navigation. See the Create section for more information.
Content Ideas
Edit an idea
In the ‘Idea’ column, there is only one action button, ‘Edit Idea’. This opens up the Idea dialog window where you can adjust the Targets and Idea for this piece of content.
Delete an idea
If for any reason you decide you no longer want to keep an idea, simply drag the Content Card down onto the red square at the bottom of the column.
This can not be undone, so only click continue if you’re 100% sure!
Production Stages: In Progress
Defininition
In Progress is when your content is being written, layouts updated, imagery added, etc. Basically, this stage covers everything after you have decided to move forward with an idea through to before being ready to schedule its publish date.
Edit In-Progress content
ContentCanvas has multiple editors depending on the type of content you are working on:
Rich Text Editor
Social Media Post Editor
Image Editor
Graphic Designer
Email Editor (Launching soon)
Video Editor (Launching soon)
Audio Editor (Launching soon)
To edit a piece of content it must be in the In-Progress column.
Click the action button ‘Edit’ on the Content Card to open the appropriate editor for that content’s type.
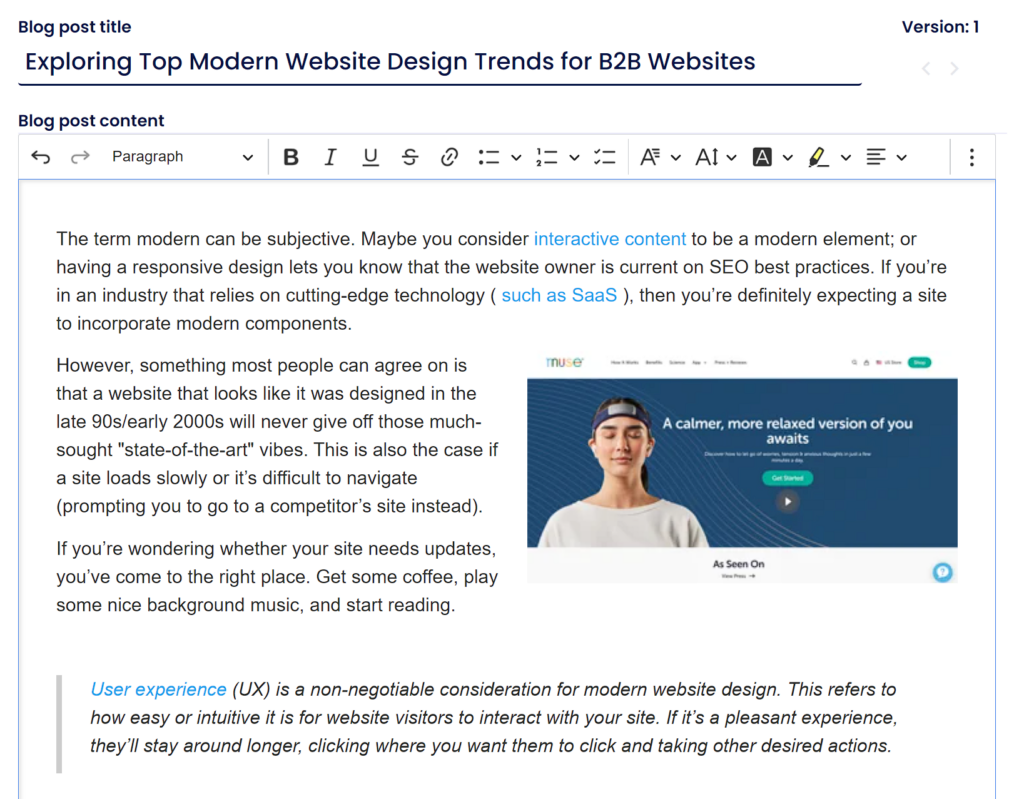
Rich text editor for Blog Posts
Preview In-Progress content
You can Preview your content at any time to see how it will look outside of the editor.
From the Canvas, you can preview by clicking the action button on the Content Card if it is In Progress or Ready to Schedule.
If the Content is Scheduled, then clicking anywhere on the Mini-Content Card will open the Preview
Preview your content at anytime
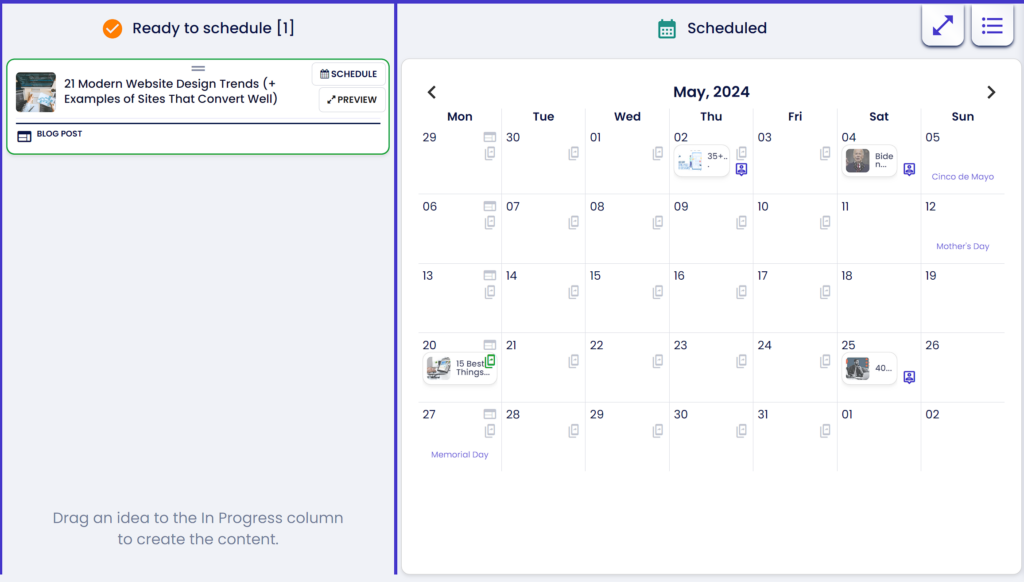
Production Stages: Ready to Schedule
Defininition
Ready to Schedule content has had all edits made and any approvals required have been given. This means the content is good to go live and the final thing required is to set its publish date.
Schedule content
You can schedule content in a number of ways.
From the Canvas, you can drag a Content card from the Ready to Schedule column, onto the day you want this to go live in the Scheduled Calendar. This triggers the scheduling overlay where you are given options on location, time, and other settings.
Also, from the Canvas you can click on the Action Button ‘Schedule’, which has the same effect as dragging it onto the calendar, except the dagte needs to be selecte4d in the scheduling pop-up.
Scheduling content
Production Stages: Scheduled
Defininition
Scheduled content has a Publish Event assigned to it, meaning that it is queued to be put live at the set time. Publish events are attached to any content whether it is a blog post or social post, or email, etc.
Views
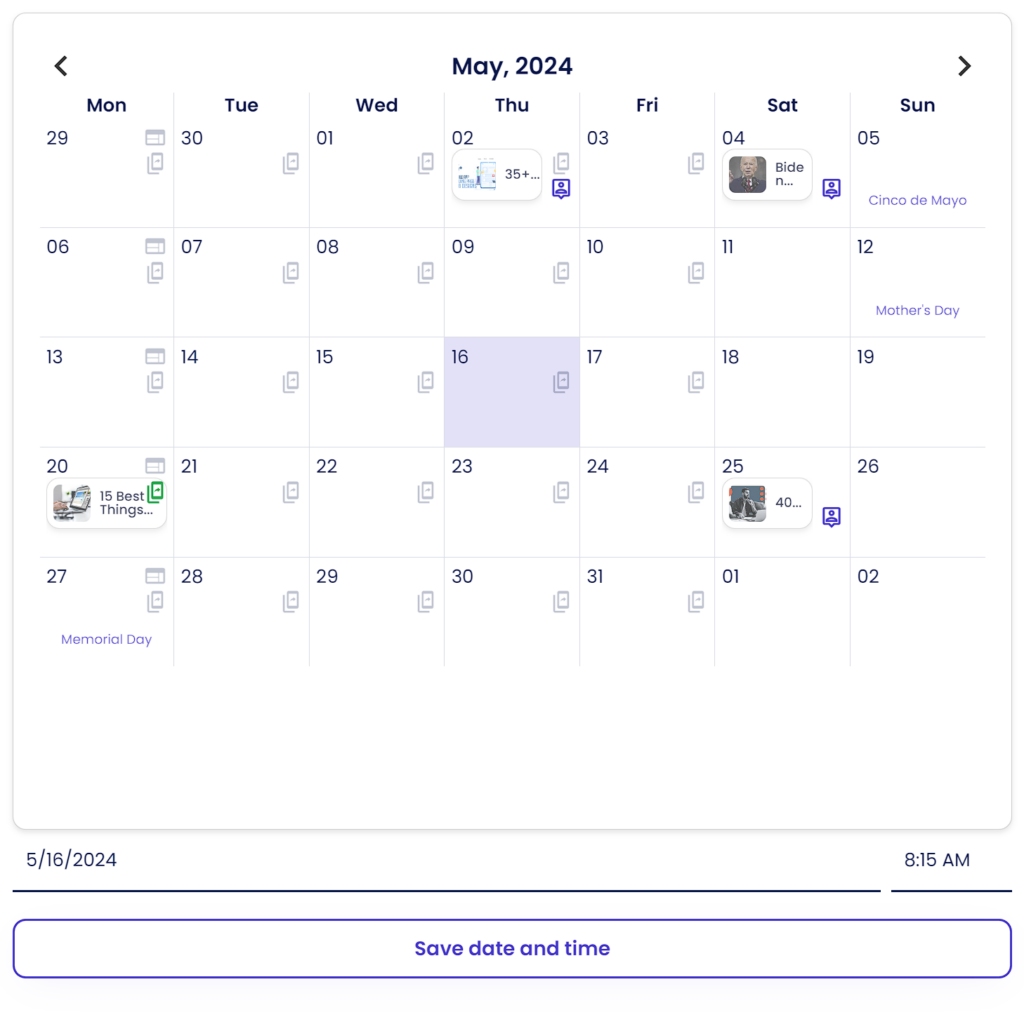
The Scheduled column of the Canvas has two views, a calendar view and a listing view.
The calendar view provides a high-level overview of your publishing, giving easy insight into any gaps in the month.
The listing view gives you easy access to all content that is currently scheduled in one place.
Calendar features
You can navigate through different months by clicking on the left and right arrows.
Each day in the calendar shows any content scheduled for that day and icons showing your target posting days.
If you have scheduled content on a target posting day, the icon will display as green.
Content on the calendar can by dragged from one day to another to change the posting date.
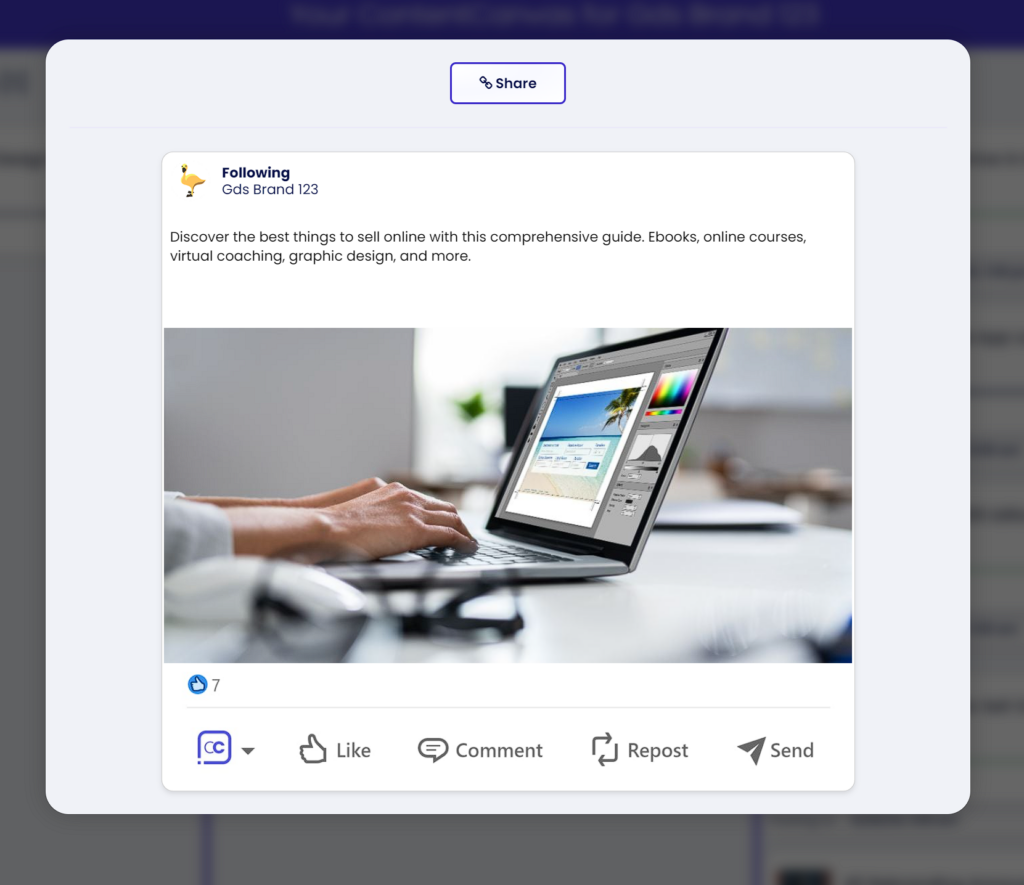
Clicking on the Content Card will open a preview of the content being posted, along with options to share the preivew, and edit the Publish Event date and time.
Manual posting
When a channel is connected to ContentCanvas, the platform will automatically publish it the the selected channel(s) at the selected data and time.
Sometimes however, the content you create may be for a channel or website for which you do not have an active integration. For these situations, we have included an option to mark the content for Manual Publishing.
Manually published content still has a date and time assigned, just without any associated channels. This ensures that the content shows on your calendar, with a reminder on when to publish.
Manually Published content will not automatically move to the live column when the date and time is met. Instead an Action Button will display for you to confirm that the content is live.
Clicking ‘Content is Live’ will update the content’s status and will give you the option to add a link to the live content.
Production Stages: Live
Defininition
The Live column is an expandable column on the right side edge of the Canvas.
Content displayed here has been posted from ContentCanvas to your website or channel. Or, content manually published and marked as Live.
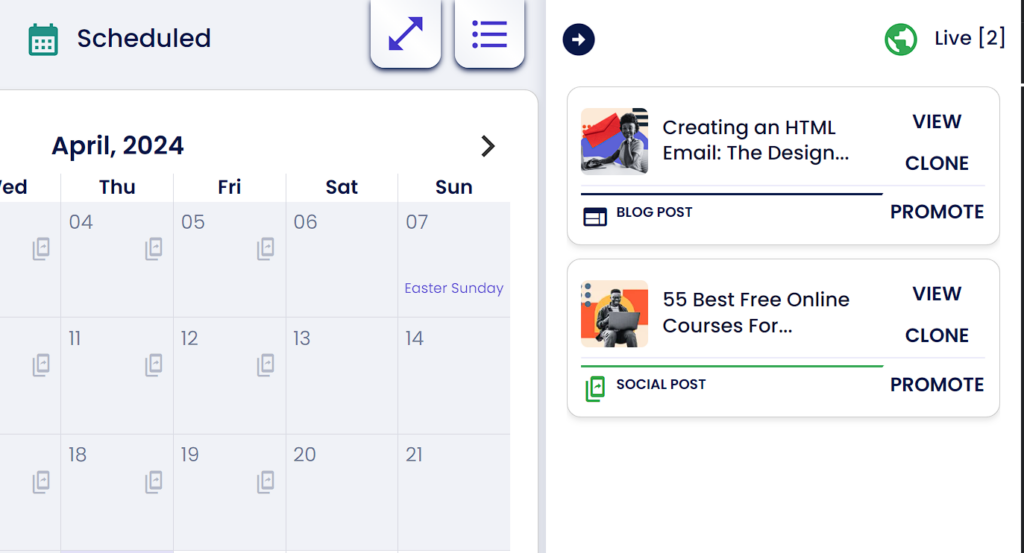
Content cards in the Live column have three Actions Buttons.
View – Will link you to the live content. This will only display if the content has a URL to the content saved.
Clone – Will create a new version of the live content and save it in the In Progress column. This is useful for repurposing existing content.
Promote – Will create a new Social Post of the Content. This is useful when a blog post has gone live and you want to generate a Social Post to promote it.
Live content options
Create
Overview
Usage
ContentCanvas is a paowerful all-in-one solution for Planning, Producing, and Promoting your content. The platforma allows you to produce a wide range of content for your website, social media channels, and more.
The content production features were designed based on real-world use cases and follow the best practices expert content marketers use everyday.
Create new content
All content types
To create a new piece of content, click on the ‘Add New’ button in the primary, left-hand navigation.
You have multiple content choices from the overlay under the ‘Create new content’ heading. All follow the same basic work flow.
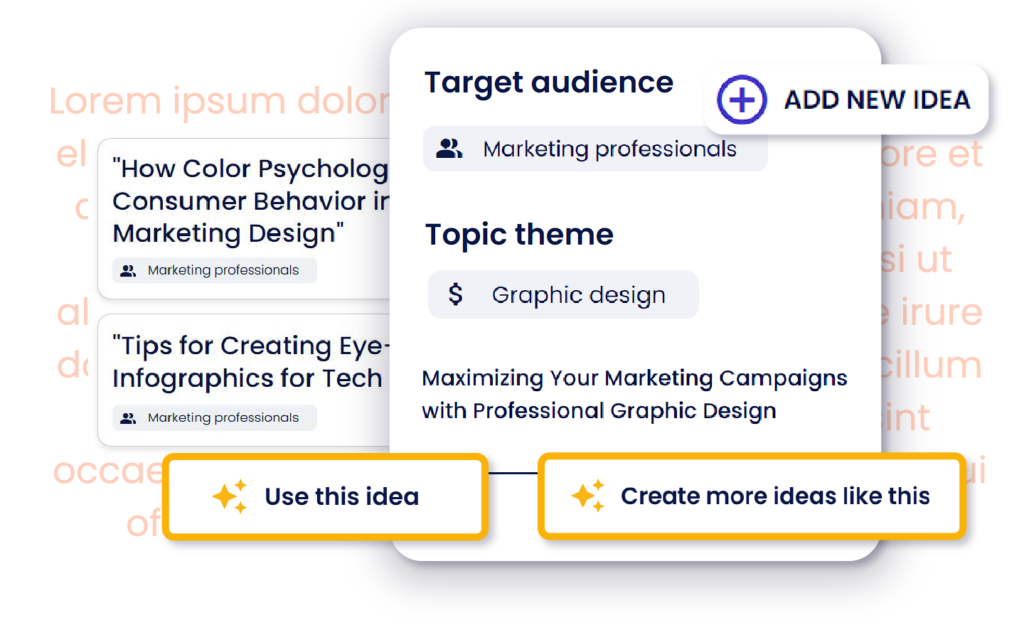
First, select the content type, then you will see a new panel with options to assign Content Targets.
Setting Content Targets is of critical importance no matter the type of content you are producing. Even if you are working without AI asistance, it is always strongly recommeded to clearly define your targets.
who you are writing for (Target audience)
what do you want to communicate (Target topic)
is there specific industry terminology (target industry)
which product or service does this relate to (target offering)
Even if the content is a thought-leadership piece, you want to align it with you product and services.
With the Content Targets set you can either add an idea you already have or ask the AI to generate ideas for you.
Once an idea is added either by you or by the AI, you can start the content production process by clicking the Action Button in the panel, or by dragging and dropping the Content Card from the idea column into the In Progress column.
Blog Posts
When blog posts are added to In Progress, the platform AI takes into consideration your brand, the content targets, and the supplied idea to generate an outline.
A blog outline is essentially a description of the different sections of the full blog post. This step is a best practice used by professional writers as it allows you to think through the main topics and concepts to cover.
When ready, the Blog Post outline editor will display. Take the time to review the outline, add, edit, or delete anything you think will improve the content and then click an Action Button to the right hand side.
Clicking ‘Generate Blog Post from Outline’ uses AI to write the initial version of the content for you.
Clicking ‘Skip AI Generation’ will take you straight to the Blog Content Editor without any changes made to the outline.
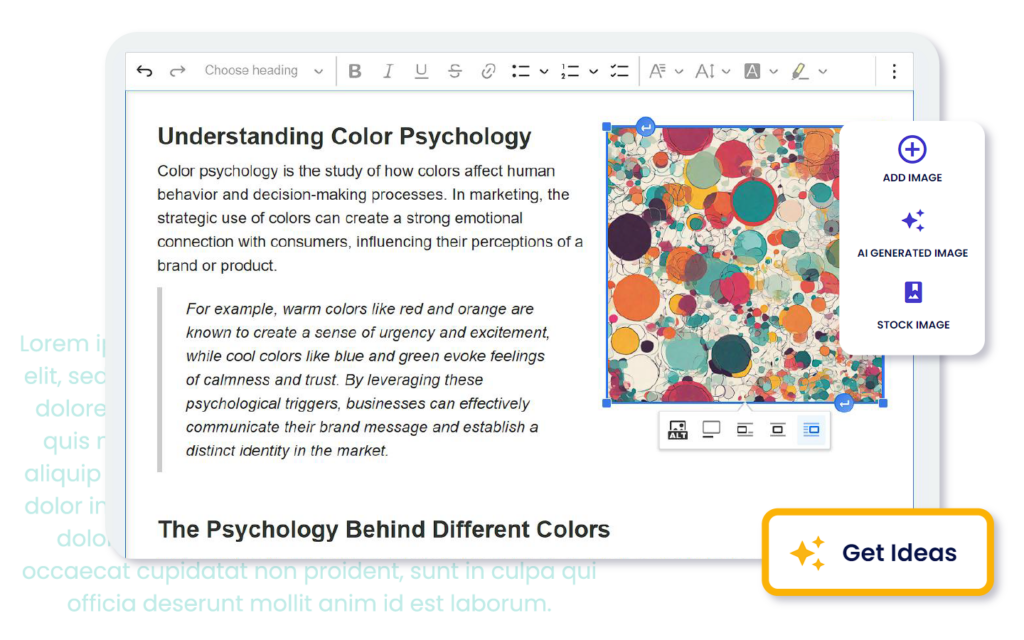
The Blog Content Editor is a powerful tool for writing, styling, and applying layout to your piece. It also has many additional features for adding images, optimizing for SEO, and making new variations of the content. View the Blog Content Editor section for detailed information.
Social Posts
When social posts are added to In Progress, the platform AI takes into consideration your brand, the content targets, and the supplied idea to generate the post caption.
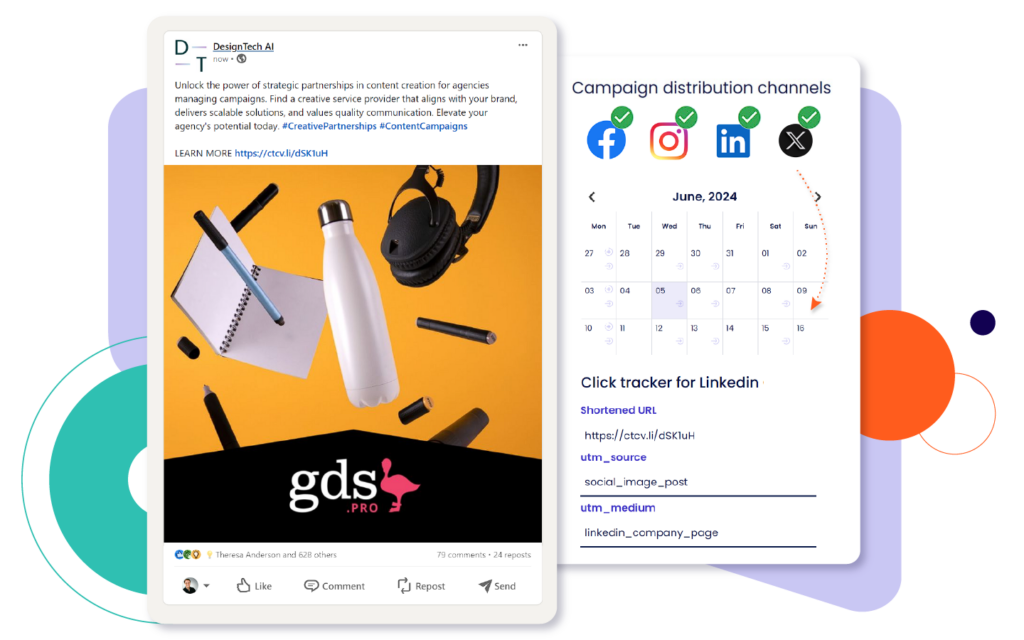
When ready, the Social Post Editor loads with a preview of the final output, and tools to edit the text and images.
The Social Post Editor has a wide-array of features to customize any aspect of your social post. See the Social Post Editor section for detailed information.
Other content types
Blog and social media content are the foundation for a strong content marketing strategy. But there are numerous other types of content formats and mediums to truly get the most ROI out of your content.
Coming soon to ContentCanvas are production workflows and editors for Emails, Videos, and Documents along with integrations for you favorite content tools such as Canva, Mailchimp, Hubspot and more!
Import content
Usage
ContentCanvas is designed to empower users to create content from scratch but also to repurpose existing content in any available format. You can import text and images from any webpage or upload a PDF. In the near future we will be adding support for other file types including video.
Import from a Single URL
To import the text and images from an existing page, such as a blog post, your homepage, or a product page, start by clicking ‘Add New’ in the left-hand nav, then select ‘Import URL’.
Paste the full, publically accessible URL to the wbe page. Ensure the page is secure (https)
Clicking ‘Import’ will start the process. Our software will load the webpage to our servers and extract the core content and images, while removing all of the extra elements around the content such as the navigation, header, footer, ads, etc.
Once completed you will be presented the clean html in the Content Editor, ready for you to repurpose as needed. All images used in the content will be saved and visible in the side panel. See the Content Editor section for detailed information.
Upload a file
ContentCanvas has the ability to extract all text and images from a PDF file, without losing the main content structure such as headings and paragraph elements.
To import a PDF click ‘Add New’ in the left-hand nav, then select ‘Upload a file’.
Then either click on the Upload tool, or simply drag and drop your PDF file to start the import procecss.
Once completed you will be presented with clean html content extracted from the PDF and all images are saved and visible in the side panel. See the Content Editor section for detailed information.
From connected account
ContentCanvas has a wide range of integrations to publish and promote your content, but you can also Import content too!
To import content from your website, Medium account, or a social channel, click ‘Add New’ then select ‘From Connected Account’.
This will take you to the Integrations page where you can select the connected account you want to import from and process the content.
See the Integrations section for detailed information.
Discover
Overview
Usage
ContentCanvas not only provides all in one content production and promotion tools, but it also gives users the features you need to discover content.
The Discover section pulls realtime searcgh results from Google and opther providers, so that you can qwuickly and seamslessly find and share relevant items.
There are many benefits to being able to curate and share relevant articles. By increasing your output, without the time required to produce more original content, you will get much more traction with your social media accounts. Also, by sharing relevant industry news and insights you are further positioning yourself as an expert to your readers.
Search
Finding articles
From the Discover tab, you can input search terms exactly as you would when peforming a Google search.
You can also select a from one of your Target Topics prepopulated by the platform.
After hitting ‘Search’ you will see a list of results with the Website name, page title, description and URL.
Click on a result to get more information displayed on the right-hand side of the page. From here we also load any featured images and more details that can be found.
Saving to your Canvas
Once you have found an article you want to save, select the artcle on the left and then you will see options for how to save it.
Use as ‘Blog Post’ will use AI to extract the article content and write a blog post with key takeaways from the article and a link to read the full piece.
Use as ‘Social Post’ will use AI to extract the article content and write a short social caption that introduces the content to your followers and provides a link to open the original article.
Analytics
Usage
Dashboard
Keep track of all of your content can be as challenging as creating it. But without knowing all of the data behind your content, then it is easy to lose focus.
From within the Analytics section you can view a wide-array of data about your content marketing.
View content production over time
View posting frequency
View how many items of contentg you have produced by type
View how many items of content you have produced by target. This can be particularly usefuil to ensure you are meeting all of your objectives.
Intergrations
Website Analytics
Launching soon will be a number of options for extending the Analytics features of ContentCanvas.
Connect to Google Analytics – coming soon
Advanced click tracking with UTM codes – coming soon